Add a zone configuration
You can use the Zone Configurations page to add a new zone configuration.
About this task
To create a zone configuration you need to:
- Define criteria that describe the objects that will be assigned to the zone.
These criteria include options such as:
- Network segment
- media access control (MAC) address fallback
- virtual local area network (VLAN) handling
- Specify the attributes that Vantage should apply to these assets and nodes
Procedure
-
In the top navigation bar, select
 The administration page opens.
 -
In the Organization settings section, select
Zone Configurations.
The Zone Configurations page opens.
-
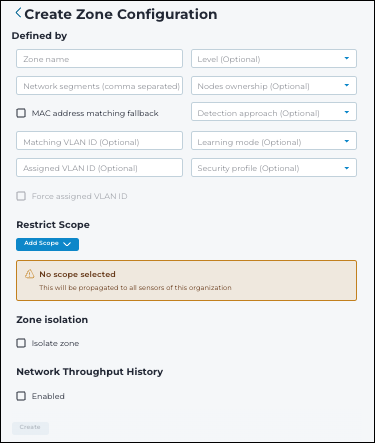
Select Add.
The Create Zone Configuration page shows.
-
In the Zone name field, enter a name for the zone.
Note:We recommend that you enter a name that is distinct in the wider context of your network. For example, enter a name that is meaningful when nodes in this zone appear in the graph. -
In the Network segments field, specify the portion of the network that
belongs to the zone.
Note:You can enter one or more internet protocol (IP) addresses to specify a network segment. To specify a range of addresses, use either classless inter-domain routing (CIDR) notation, or enter two IP addresses that form a range. The range you specify must include both ends (e.g.,
192.168.3.0-192.68.3.255). To specify multiple network segments, you should separate them with a comma:192.168.2.0/24, 192.168.3.0-192.68.3.255 - Optional:
If you use MAC addresses to categorize nodes,
select the MAC address matching fallback checkbox to
enable this setting.
Note:For a node to be considered part of a zone, its node identifier (ID) must match one of the zone's network segments. In some cases, the node ID might not be sufficient to correctly categorize nodes. For example, you might want nodes that use an IP address as their node ID to belong to a zone that is defined with MAC address ranges instead of IP addresses. In such cases, enable this fallback matching strategy in order to match against the MAC address of the node whenever the node IP does not match any segment.
- Optional: If you use VLAN IDs to categorize nodes, select the Matching VLAN ID checkbox to enable this setting.
- Optional:
If the zone only includes nodes that belong to a specific VLAN, select the Matching VLAN ID checkbox to enable this
setting.
Note:You can use VLAN IDs to determine which nodes are included in this zone. For example, in a zone where its network segment is defined as
192.168.4.0/24, the VLAN ID is 5. The network has two nodes:192.168.4.2belongs to VLAN with ID 5192.168.4.3doesn't belong to a VLAN. In this case, when Matching VLAN ID is enabled, only192.168.4.2is included in the zone. - In the VLAN IDs field, enter the VLAN ID of nodes that Vantage should include in this zone.
- In the Assigned VLAN ID field, enter a VLAN ID to assign to nodes in this zone that do not already have an ID.
- Optional:
If your organization uses the Purdue Reference Model, select the appropriate
level for the nodes in this zone in the Level dropdown
list.
Attention:In cases where a node belongs to multiple zones with different Purdue levels, you should use the most restrictive level.Note:When you filter the graph, you can select Level to review your Purdue level assignments.
- Optional:
In the Nodes ownership dropdown, select from:
- Public
- Private
Note:Private nodes belong to the local network, Public nodes do not. - Optional:
In the Detection approach dropdown, select from:
- Adaptive Learning (default)
- Strict
- Optional:
In the Learning mode dropdown, select from:
- Protecting
- Learning
Note:This setting determines whether sensors should monitor the zone against the existing baseline, or collect data about the zone's nodes and activity. - Optional:
In the Security profile dropdown, select from:
- Low - Lowest visibility level. Only the most severe alerts are visible
- Medium - Medium visibility level
- High - High visibility level. All relevant alerts are visible. High is the default setting
- Paranoid - Additional alerts that may be informational are added
Note:The security profile determines the visibility of alerts that are raised by sensors monitoring nodes in this zone.Note:If you change the security profile for a zone configuration, it only affects newly-generated alerts. It has no effect on existing alerts. -
In the With Scope section, select the Add Scope
dropdown and select from:
- Tag
- Site
- Sensor
Note:This lets you select the type of object that should restrict the scope of this zone configuration:- Tags are admin-defined keywords or terms applied to Vantage objects to provide finer control of system behavior
- Sites represent the real-world locations of your nodes
- Sensors are the downstream applications, such as Central Management Console (CMC)s and Guardians, that aggregate and send data to Vantage
A dialog opens. -
Select the
 icon. Select an option to filter
for the item you want to select.
icon. Select an option to filter
for the item you want to select.
- Optional:
If necessary, select Isolate zone.
If selected, this zone's assets will not be merged with assets outside of this zone.
- Optional: If necessary, in the Network Throughput History section, select Enabled.
- Select Confirm.
- Optional: To add another item to define the scope, do steps 17 thru 20 again as necessary.
- Select Create.